 When you first start online, the idea of creating your first website/blog can seem very confusing and overwhelming.
Knowing what steps you need to take to get your website from your mental concept/brain to the internet may feel like a complex task that requires a lot of work.
In reality, setting up a website or blog is actually quite easy and can be done in less than 15 minutes if you know what you’re doing.
Having spent a lot of time making websites for ourselves and our friends, we’ve distilled the essence of how to create a website into an easy step by step process with plenty of visual graphics to get you up and running quickly.
Note: This article does contain affiliate links, which allow me to make a commission if you buy a product/service through one of my links. Please know that I use these products regularly on my own websites and recommend them because I have found them extremely useful and would not recommend something I haven’t used or thoroughly researched.
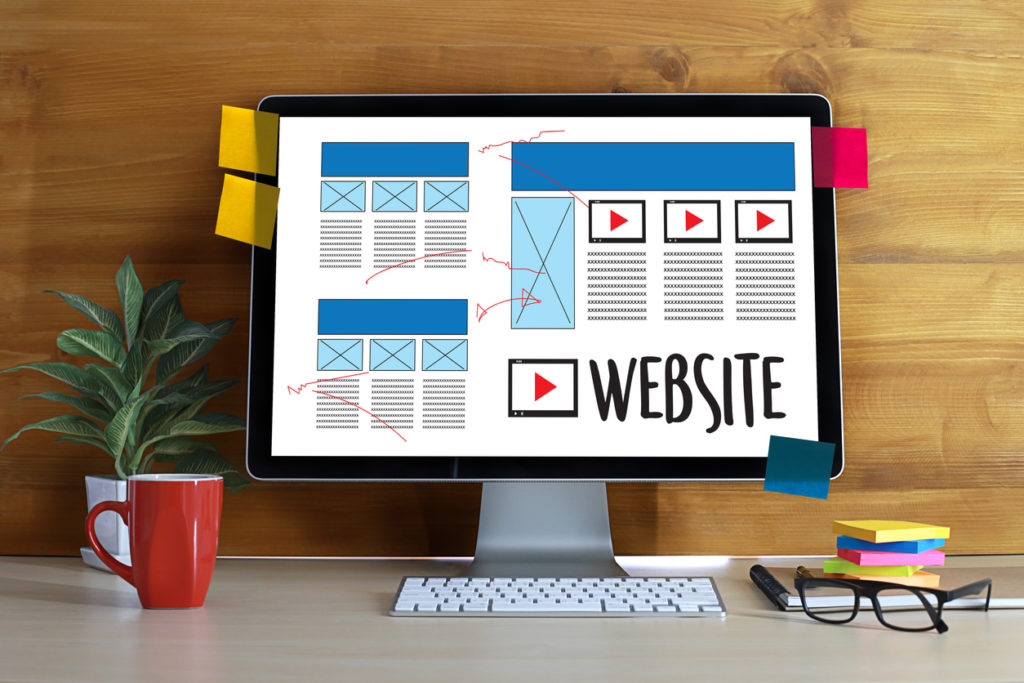
A 3 part visual guide for creating your first website or blog in 15 minutes (with lots of pictures)
 Before dividing into the 8 simple steps for creating a website tutorial, I’d like to provide a quick visual reference guide for those who are ready to begin their journey now!
The purpose of this 3 part visual guide is to help teach you how to start a website (with pictures) in 15 minutes or less using Bluehost, so that you can be up and running as quickly as possible.
Beyond the visual/picture guide and 8 step tutorial, I’ve included a section that offers advice and ideas for setting up and developing your content, website design, and navigation, so that your future audience will be able to get the most out of your website.
Let’s get started with our 3 part visual guide for creating your first website or blog.
Note: If you prefer to skip the visual guide on setting up a website in 15 minutes with Bluehost, you can click here to jump to the 8 simple steps for creating a website section. However, the visual guide is a wonderful tool for anyone who is just starting and doesn’t know/understand how to get a personal website up and running.
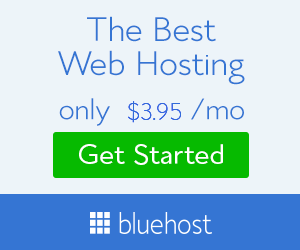 Bluehost Web Hosting offers an excellent hosting plan for new bloggers who want to get a website up and running quickly in 15 minutes or less with just a few clicks!
Part 1. Domain name and hosting

The first part of setting up your website/blog is choosing your domain name, as this is the URL/brand name that your website will be known by and found when typed into the search bar.
As you can tell, the domain name we chose for this website is FromDreamsToLifestyle. Try coming up with several domain names that you like and feel would explain what your website is about.
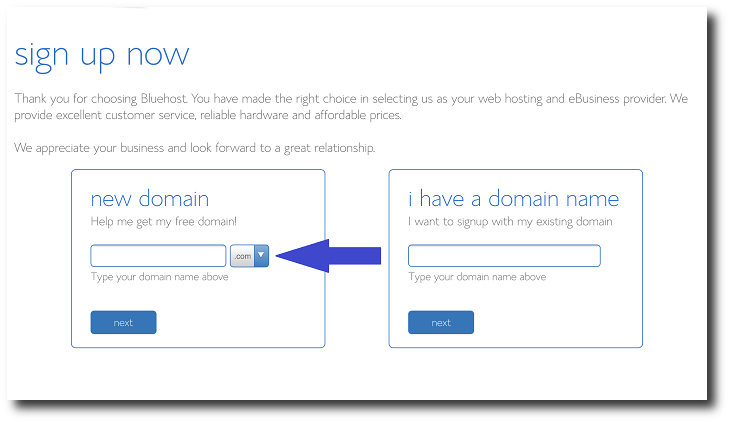
Once you’ve gathered your list of names, head over to Bluehost and check to see if your domain name is available by going to the sign up now page and entering the domain name in the box that looks like this:
Alternatively, you can use the domain name search tool below to see if a particular name is available for the website you’re going to create!
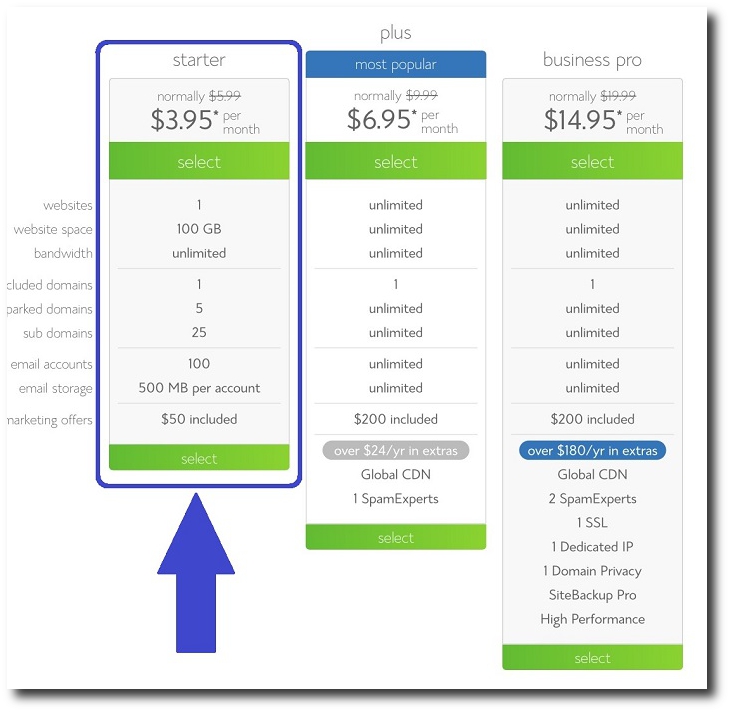
Each plan has its own features. However, the starter pack allows you to start your website at a very cost-effective price, and you likely won’t have to worry about upgrading to a higher plan for a long time.
If you prefer the higher tier options, a few more comprehensive plans offer their own advantages. They can be beneficial for those who need more website space or require additional features.
Once you’ve chosen your plan, you’ll be asked to choose which package information you want to add. I suggest adding Domain Privacy Protection to your website as it will keep your personal information such as your personal name, home address, and phone number private from the public.
 If privacy is important to you, then domain privacy protection is a very low-cost way to keep your personal domain information confidential. There’s also a more information link on the package information page that goes into more depth about domain privacy protection if you have additional questions.
 Why You Should Choose Bluehost
- EASY One Click WordPress Installation
- ONE FREE Domain Name For 1st Year
- FREE SSL Certificate Included
- EXCELLENT 24/7 Support
- ATTRACTIVE Low-Cost Budget-Friendly Plans
- WordPress provides incredible software for Bloggers, Personal Websites and Businesses
If you want to learn more about why we use Bluehost for our websites, blogs, and small businesses, then you can quickly jump to our why we recommend Bluehost section here.
Otherwise, please feel free to read part 2 on how to install WordPress on your website.
Part 2. Installing WordPress
Once you’ve finished the registration process and have a domain name for your website/blog, it’s time to install the software that will power your website and allow you to blog, sell products or share whatever it is that is important to you.
Don’t worry; installing and setting up WordPress is very easy and only takes a few clicks to get your website/blog up and running online.
WordPress is straightforward to use and will allow you to manage your website with little or no technical knowledge. Best of all, WordPress powers some of the largest and most influential websites on the internet, such as The New Yorker, BBC America, Beyonce Bloomberg Professional, and the Microsoft News Center, among many other highly credible websites.
As a wonderful all-around software platform, WordPress allows for a ton of flexibility in terms of customization, functionality, and personal management, so that you can design and build your website to suit whatever ideas you have in your head.
Here’s how to set it up.
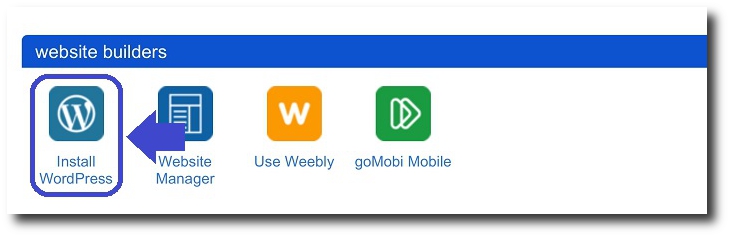
After registering your domain name and hosting plan login into your new Bluehost account and look for the Website Builders section. Once you’ve found it click on the WordPress logo that says, “Install WordPress.”
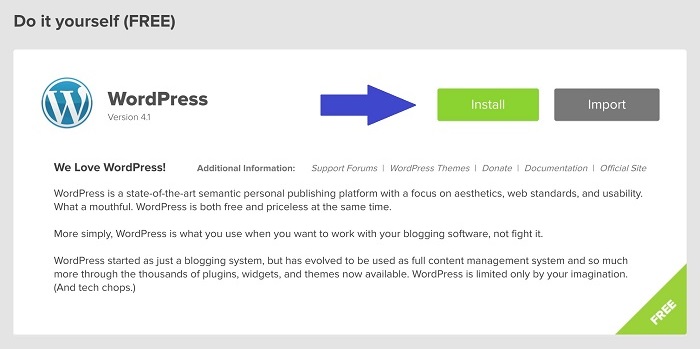
On the next page where it says Do it yourself (FREE), click on the “Install” button. Note: You can have Bluehost set up your WordPress software for you if you’re confused with the process or prefer a more guided experience.
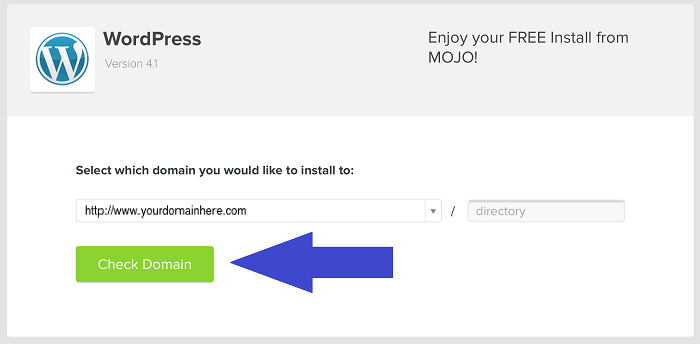
You’ll be taken to the domain selection page, where you choose which domain name you want to assign to your blog. For most people, this will be the domain name you chose in part one, where you picked your domain name and hosting plan.
Once you’ve clicked on your domain name in selecting which domain you want to assign section, make sure that you verify that you have the correct domain name selected (if you own more than one) and click the “Check Domain” button.
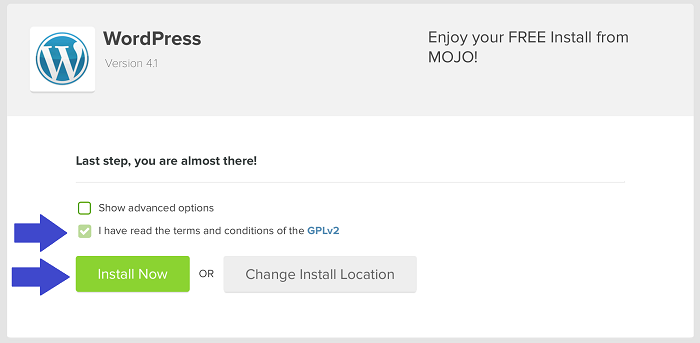
Check the box that says that you have read the terms and conditions, and then click the “Install Now” button. Of course, you are free to read through the terms and conditions before installing via the link provided by Bluehost before installing WordPress if you would like to learn more about their terms and conditions.
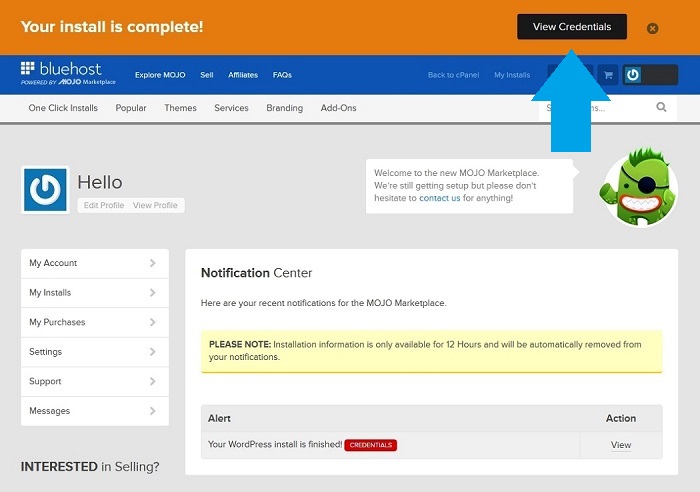
Once you get the message that says, “Your install is complete!” you’ll want to click on the “View Credentials” button where your can view your Admin URL, Username, and Password.
Ensure that you write them down as they will be needed to log into your website once you’ve completed the process.
Don’t worry if you forget your password or don’t like the one given to you; you’ll be able to change your login information (username and password) later, but you’ll need them the first time you log into your website.
Note: You can also sign in to your website by directly signing into the Bluehost website and clicking on the login button if you don’t remember your website admin/password information.
Once you’ve written down your Admin URL, Username, and Password, type your Admin URL into your web browser, which will take you to the login page on your website, as seen below.
As mentioned previously, you can also sign into your website directly through the Bluehost website by signing into Bluehost and clicking on the login to the WordPress button for your website.
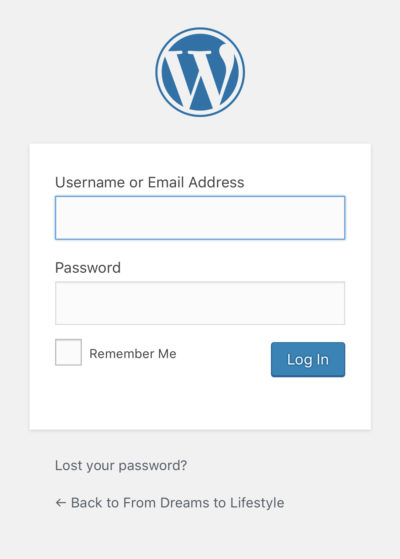
The image above (the admin login page) shows what your login page will look like. It’s where you’ll enter your personal login credentials, which will give you full access to your website so that you can begin adding content, uploading images, blogging, offering products, sharing your story, or doing whatever else it is you want to do with YOUR WEBSITE!
Simply enter your Username and Password, and voila, pat yourself on the back as you have officially logged into your new website/blog. Congrats!
Ensure that you are on the correct admin log-in page before entering your information by checking the back to “your domain name” link shown in the image above, which should identify your website’s name.
You can also check the URL to ensure that it is the correct URL for your website for extra security.
Note: For those who have lost or forgotten their password, you can click on the (Lost your password?) link to receive an email that will help you reset your password.
Even though you’ve officially set up your new website and now have a blog up and running, there’s just one more (optional) step involved in your set up process, and that’s choosing a theme that will provide you with the visual the look and feel of your website when visitors come to see it, which we’ll explain in more detail in part 3.
Part 3. Choosing a theme (website design)
Congratulations on setting up your first website/blog.
At this point, you can now start creating and posting your own content if that’s what you want to do. However, we suggest that you choose a theme (website design) to make your blog look more attractive and professional, especially for those going to visit your website and navigate through your soon-to-be content-filled site/blog.
While you can simply keep your website as it is and use the default/generic theme that was chosen for your site when you signed up, there are a ton of professional themes that allow for more customization, personality, and individuality.
Themes/designs function to provide a unique look for your website and allow for specific types of functionality that can differ from one theme to another.
For example, if you’re someone who is looking to create a website focused primarily on selling products, then you’ll want a theme that offers functionality specific to those products when compared to a website that focuses on photography or blogging.
Best of all, a well-designed theme allows you to create a professional-looking website that keeps people on your site for longer, creates a more professional and experienced appearance, makes your content stand out and feels more inviting, and converts more visits into sales.
In fact, themes are one of the most exciting parts of owning a website, and when combined with WordPress, these two pieces of software offer a ton of flexibility when it comes to customizing a website that works best for your personal needs.
Depending on the themes you choose, some companies, such as StudioPress, allow you to quickly and completely change your chosen theme and its appearance with the click of a few buttons. Other companies may offer less selection, but provide more comprehensive design customization set with their package.
When it comes to selecting a theme, there are a few options you can choose from to improve the overall look of your website.
These options include:
- Keep the current theme you have
- Choose a free WordPress theme
- Buy a professional theme
- Hire someone to create a theme for you
Seeing how this is your first website/blog and you probably don’t want to spend a lot of cash on hiring someone to design a professional theme, I’d suggest either choosing a free theme that is offered by WordPress just to get you started or buying a professional theme, which you can do for around $50 – $150 depending on the theme you choose.
WordPress offers a ton of great starting themes that won’t cost you a dime. However, they may be more limited in terms of functionality and flexibility when compared to some of the professional themes you can buy that will not only give you a great design, but will also allow you to customize your theme, add additional options and implement theme-specific widgets and functionality so that you can create a very professional looking website at a very cost-effective price.
If you choose to buy a professional theme as we always do with our websites, I suggest buying a theme from one of these amazing theme design companies/markets.
- StudioPress
- Elegant Themes
- DIYthemes
My personal favorite and the one we often use for our professionals looking themes is StudioPress. However, each of these websites offers a great selection of themes and designs that can meet your website’s needs and give it a professional high-end look at a very cost-effective price.
Before determining which professional theme you want to choose, we suggest thinking about your website’s functionality and its representation. Some companies will offer category-specific themes where you can look at themes based on their purpose and topic, such as:
- Blogging
- Business/Enterprise
- eCommerce
- Education
- Lifestyle
- News/Magazine
- Photography
- Portfolio
Based on these categories, you can try to determine which 1, 2, or 3 categories your website is likely to fall under so that you can select a theme that will provide you with the right flexibility and functionality for your specific needs.
How to Create a Website In 8 Simple Steps
This section of the article is for those who prefer a less visual presentation with more detailed information and additional steps to set up a website from scratch.
Our step by step (how to) guide for creating a website/blog works for both Bluehost and non Bluehost websites, and offers a more technical approach for those who require additional steps, such as if you choose a separate domain name and hosting service where you need to link the two together to get a website up and running.
If you prefer Our 3 Part Visual Guide For Creating A Website In 15 Minutes, Click Here to refer to that section of the article as it details the step by step process for setting up a website (using Bluehost) with lots of informative pictures. It’s a wonderful guide for those who want to set up a website in the fastest and easiest manner possible.
8 Steps for Creating a website include:
- Choose a domain name
- Register your domain name
- Choose a hosting service
- Connect your domain name to your web host
- Install WordPress
- Choose a theme/design for your website
- Configure your website
- Add content
Step 1. Choose a domain name/URL
The very first step you’ll want to take when it comes to creating a website is determining what domain name you want for your website, because before you can create a website/blog, your hosting company will ask you to decide on what the name of your website and URL (domain name) will be.
This is one of the most important steps you will make because as you begin to build content on your website, everything you create will be linked to your website’s domain name (URL), and your visitors will also know you by the domain name you choose. Some people choose a domain name that relates closely to and resonates with their website’s main topic and is likely to be searched for under a specific keyword or search term.
Think about what your website will be about and try to choose a domain name related to that topic or set of topics.
Other people or companies will choose a domain name/URL that helps people identify what their brand is about and what it stands for. If you are creating a brand, then your domain name may want to use the brand name for its domain name or a very close variation that people will connect with the brand.
In the end, you’ll have to choose a name that you’ll be happy with as this will determine what the search engines (Google, Microsoft, etc…) and your visitors think about your website. Take your time and think about what you are trying to do with your website and what will help you decide on choosing the right domain name for your website.
Step 2. Register your domain name/URL
After you’ve decided on a domain name and have found one available to use, there are several registering services that will allow you to register your chosen domain name, often for minimal cost, $10 – $20 per year.
For the sake of speeding things up and to save you some money, there is a variety of hosting services, such as Bluehost, that will give you a free domain name with your hosting account, which can make setting up your website easier and save you a few dollars.
We use and recommend Bluehost as they provide several useful features and automatically link your domain name to your hosting service so that you don’t have to go through the confusing and time-consuming process of talking to multiple companies have your domain name and hosting linked together.
If you prefer to use a separate company for registering your domain name, you can find a registering service extremely easily by searching for the best domain registrars and registering your name through that company. Once you’ve done so, you can then contact the hosting company you’ve chosen and have them link your domain name to your hosting service.
Step 3. Choose a hosting service
After deciding on your domain name and getting it registered, the next step you’ll need to take is finding a hosting service that will host your website.
One of the best hosting services I have found and use for my websites is BlueHost, which offers tons of hosting space, a free domain name for your first site, great customer service, and a 99.9% up-time guarantee (at time of writing).
If you decide to go with another hosting service, here are some useful tips to help you choose a good service.
- Make sure the hosting service offers good reliability and speed.
- Find out how you can contact them if you need help and make sure they offer excellent customer service.
- Check to see if the hosting service allows you to access your website through a control panel so you can manage the back-end of your website.
- Make sure the hosting service gives you lots of storage space.
Step 4. Connect your domain name to your web host
If you have chosen a web host that offers a domain name with their hosting service, you can skip this step as most hosting services will make it easy for you to connect your domain name to your hosting service and walk you through the steps to create your website.
Our 3 Part Visual Guide For Creating A Website In 15 Minutes can walk you through the process (which is very easy) using images so that you don’t get lost or confused.
If you have chosen a registrar different from your web hosting service, you’ll need to connect your domain name with your web host. To connect your domain name with your web host, all you have to do is ask your web host for your server name or DNS and plug your DNS into your domain name registrar account.
You can also contact your domain name registrar and have them walk you through it, as it can be a bit confusing the first time around. Bluehost does a fairly good job of walking people through how to connect their domain name to the hosting service if you didn’t choose your domain name through Bluehost.
Step 5. Install WordPress
After you’ve chosen your domain name and created a hosting account, you’ll need to install software that will allow you to manage, customize, and build your website as you like. Whether you want to create a blog, start an online business, or build an e-commerce site, WordPress is a great choice for helping you run the back end of your website.
Not only is WordPress free, but it’s also one of the best all-around software platforms available for creating websites, starting blogs, and building a business.
The WordPress software that will power your website is extremely flexible, highly customizable, simple to navigate, and easy to learn. In fact, this software powers some of the most well known and respected websites on the internet.
And because of its popularity and favored support, thousands of website design themes and plugins are available to help you get your website looking and running just how you want it with all the functionality you need to get up and running quickly and smoothly.
Hosting services such as Bluehost offer a simple one-click set up for installing WordPress on your site right from their dashboard, so you don’t have to deal with any complicated setup or confusing instructions. Your website will be up and running in minutes.
Step 6. Choose a theme for your website
There are many free and premium (paid) themes available for WordPress that allow you to choose a design that suits your website’s look and functionality.
While many of the free themes available offer you a degree of design and functionality, the premium themes are often more professional looking and give you much more flexibility in customizing your website, and can often be purchased for less than $100.
In fact, StudioPress offers some of the best premium themes available for WordPress.
You can also read this post on choosing a premium theme: Designing a website on the cheap and why WordPress premium themes rock.
Step 7. Configure your website
Now that your website is up and running and you’ve chosen your theme, you’ll want to configure your website so that you provide the best experience for your visitors.
Set up your navigation and make it easy for your visitors to know what your website is about and give them easy access to the most important parts of your website.
Choose two or three primary colors to represent your site but don’t go overboard as too many colors can turn off your visitors or detract them from what is important.
Organize, separate, and highlight the important areas of your site to provide additional clarity.
Install any plugins you may need to get your website functioning just the way you want and add any final touches that you may want on your website.
Step 8. Add content
If you’ve made it to this part, congratulations, you’re all set.
Now you get to have fun and start adding content to your website!
If you’ve made it this far, then hopefully, our step by step directions on how to create a website/blog has helped you get started with your own
Mentioned in this post:
- BlueHost
- WordPress
- StudioPress
- Additional WordPress Themes
Why You Should Use Bluehost for Your Website, Blog, or Business
As a hosting solutions company, Bluehost offers a great way for anyone to start a website or blog at a very low cost with excellent 24/7 support, and fast and easy WordPress integration.
Bluehost currently supports over 2 million websites worldwide and is a highly trusted company for many blogs and small businesses who want to get up and running without the hassle of a complicated and time consuming set up process.
Best of all, Bluehost and WordPress allow you to create a website without any HTML knowledge, coding experience, or difficult setup.
When it comes to storage space and flexibility, Bluehost offers a highly stable platform with 50 Gigs of memory for the starting plan (at time of writing), which provides plenty of room for images, video, text, and code to be stored on their virtual cloud servers.
And for those who need more space or flexibility/adaptability for their website, Bluehost is highly scalable, allowing individuals and companies to upgrade their plans to fit their personal needs.
As mentioned previously, this hosting company offers easy WordPress integration so that you can set up your WordPress website in a matter of minutes with nothing more than a few button presses.
If you haven’t had a chance to read our installing WordPress section of this article, we highly suggest that you do so as it will walk you through how to get up and running with WordPress and Bluehost.
Why we choose Bluehost for our hosting solution:
- Excellent support 24 hours a day/ 7 days a week
- Bluehost offers excellent website uptime (up to 99.9%)
- Fast loading times (page load speed)
- Low monthly payments (billed annually)
- Highly scalable cloud services for those who run larger websites
- Bluehost offers VPS, Shared and Dedicated hosting plans
- Bluehost easily integrates with/connect to WordPress
These are just some of the reasons we think Bluehost is where you should go to create a website, blog, or small business.
If you are unsatisfied with your service, Bluehost does offer a money-back guarantee so that you can try out there service and see if it’s the right hosting solution for your needs, however with over 2 million websites using Bluehost (including some of our websites) we think this is an excellent hosting solution for most independent websites, blogs and small businesses that want to get started with a low-cost cloud service that will get you up and running in minutes.
Why we prefer paid hosting services
When it comes to creating a website for free, there are often many limitations in terms of what the “free” hosting companies license allows you to do with the content you create, who owns your content, and what you can do with the website itself.
For example, some websites may state that they can own your content, use it in their marketing material, change it as they see fit, or remove it altogether if they feel it doesn’t fit their rules.
In other situations, you may be limited in terms of how you can design your website/blog, the types of plugins and software you can install, the flexibility of the website’s software itself, if the hosting company is allowed to advertise or promote their own items on your blog page/website and whether or not/how you can sell your own products on the website.
Additionally, some “free” hosting companies may sell your personal information/content to 3rd parties to cover the cost of and/or make a profit on the “free” service they are offering.
With that said, not all free solutions are the same, and there is definitely a place for those who prefer using “free” websites.
Nowadays, most people who use technology use free services (including us); however, it is important to understand the licensing agreements to determine whether the “free” service is worth it and what you are trying to accomplish.
When it comes to paid hosting services, many of them allow you to rent your personal own space on their servers where you own your content, have access to private storage/cloud space (privacy), and have the freedom to promote your content and/or products however you like “legally” which typically grants you plenty of freedom in terms what you can do with your content and website whether it’s, installing powerful software/plugins, selling your own products without having to deal with a middle man, not having to worry about content being manipulated, removed or changed, not having your personal information/content sold to 3rd parties and not having to deal with certain limitations that may be imposed by “free” services.
Paid hosting services may also offer more powerful hosting options with upgraded plans that offer automatic website backup, improved performance and storage space, dedicated support, enhanced software features, and more that can really help you take your website to the next level.
Because many of the paid hosting companies profit from you renting storage space, they don’t have to resort as heavily to making a profit by selling your personal information, using your content, or utilizing other methods “free” hosting companies may use.
You should still do your research to ensure that the paid service you use provides you with the privacy and flexibility you need for your own website, blog, or business to ensure that you are being provided with the services that work best. However, this is why we like to go with a trusted hosting company for running our websites.
In conclusion, while there are a plethora of websites that do offer free options for creating a website, many of those “free options” come with a catch, limitations, and/or restrictions that you may not be aware of, which can constrain those who want to expand their website, blog or business in the future whether it’s owning the rights to your own content, promoting products or ensuring that you can maintain the freedoms of what you are doing without it being modified, changed or removed.
5 amazing reasons you should start a website/blog
If you’ve ever wondered whether or not creating a website is right for you, there are several great reasons you should think about owning your own website.
Starting a website/blog is a fantastic way to share ideas, promote products, connect with like-minded people, and promote yourself by developing an online portfolio to show off your knowledge and skills.
In fact, owning your own website goes well beyond having a social media page as you’re in control of all of the content on the website, and you make it as big and personal as you want. Your website can become the focal point of what you are trying to express, share, or sell. And it’s yours to design however you like.
Share your thoughts, ideas, and interests.
One of the most common reasons people start a website or blog is to share their thoughts, ideas, and interests with the world.
Whether you’re someone who enjoys cooking recipes, loves photography, appreciates philosophy, treasures traveling, or simply has a story to tell, having your own website/blog allows you to document and share your journey so that others (family, friends, and followers) can learn more about what you do and love.
And because you’re able to share your thoughts, ideas, and interests with the world, it allows you to become an educator and/or connect with other like-minded individuals, which brings us to our next reason to start a blog.
Become an educator
As you begin to share your knowledge and experience with others, you also create educational content and provide a unique perspective that can benefit those who follow you.
Even if you are doing something as simple as sharing your photography journey, personal story, or travel blog, there’s something for others to learn and appreciate.
Over time your thoughts, ideas, and interests can become a powerful resource for those interested in what you have to share.
For those who are educators or have a particular hobby, passion, or interest, your website can become a useful tool for teaching others what you know, how to do what you do or how to see things from a new perspective.
Connect with others
Owning a website/blog is a great way to connect with others, develop a following, and build new and meaningful relationships.
By sharing your thoughts, ideas, and interests, providing a unique perspective, and educating others, you can connect with those who share your interests, personality, and/or way of thinking.
Having a website is a wonderful way to create and become part of a community of like-minded people, which allows you to expand your own knowledge, have new experiences and share your passion with others who have the same interests.
Promote yourself / create an online portfolio
Whether you’re looking to get hired by a company, want to promote your own business, or have a product to sell, your website/blog provides an excellent opportunity to promote yourself, your knowledge, and your work.
For those looking to get hired for a job, an online portfolio is a wonderful way to publicize your history and work experience. For those who have a product to sell, your website can become the platform you use to develop, advertise, endorse, and sell your products.
And because you own your website, you can design it in a very artistic, authoritative, and personal manner that bolsters your content and encourages others to see you as a professional in your field.
Make some extra money
As we mentioned earlier, starting a website is a great way to share your thoughts, ideas, and interests with others.
For some, their websites can provide a way to earn some extra money or even make a full living by turning their interest/passion into a full-time business.
Individuals who create content in profitable niches have a unique opportunity to either create or promote products they know, love, and use to those who follow them and enjoy their content.
For example, if you own a food blog, you can create your own recipe book, sell cooking products as an affiliate, provide advertising space, or work out a sponsorship with a particular company.
You can even create a guide that teaches others how to create their own cooking blog from scratch using the same process that you used to get yourself started.
For those who primarily want to start a website to sell products and/or software, you can create an online store and promote your website through other platforms such as advertising, social media, search engine traffic, and guest posting.
5 reasons to start a website/blog
- You can share your thoughts, ideas, and interests with the world
- You can be an educator
- You can reach out to and connect with other like-minded people
- You can promote yourself and create an online portfolio
- You can make some extra money
Whether you’re looking to connect with others, create a store so that you can sell your own products/merchandise, promote your brand/image, or simply share your thoughts and stories, owning a website/blog can provide you with plenty of opportunities to connect with those who are interested in what you have to offer.
When it comes to who can or should create a website, virtually anyone who has something they want to share with the world can create a website and contribute to the online community.
If you’ve ever considered having a social media page for sharing your story, educating others, building a portfolio, or marketing your products, then it’s likely that creating a website where you own all of your content and can promote it however you like could be highly beneficial for you in the long run, especially since you are in full control of your own content and can grow/expand your website to fulfill your own wants, needs, and desires.
It provides a way to express yourself, connect with others, and/or start your own business in a format that is wholly yours and no one else’s.
You don’t have to worry about your content being mixed in with anyone else’s, modified, or deleted, and there’s a lot less concern about your personal information being sold to 3rd party companies without your knowledge.
What to do after creating your first website/blog
Establish the primary focus/goal of your website
- Choose a theme that supports your content
- Optimize the look and feel of your website
- Identify the main topic(s) of your website
- Find a professional-looking theme that properly expresses your website
- Customize/find tweak your websites appearance and navigation
- Develop a content/product strategy (consistency is key)
- Determine how you want to share/market/promote your website